

First installation
Follow the route through checks, installation and first start-up.
Before you start
DANGER
Disconnect the power and keep the system fully shut down
Before installing or adding battery modules, disconnect the AC power supply and shut the system down completely. Unplugging it alone does not disconnect the battery side.
- Check for damage: Packaging, batteries and cables must be free from damage, deformation and signs of water ingress. If anything is wrong, stop installation and contact your supplier.
- Check the accessories: The main unit includes an AC power cable; VitaMate includes a bracket and fasteners. Check against the supplied quick installation guide.
- Prepare your tools: Prepare a PH2 screwdriver, marker and other tools needed for your installation. For wall fixing, use an Ø8 mm drill bit and SW8 tool as shown in the quick guide.
Location and clearances
Choose a level, solid, ventilated and sheltered location, away from heat sources, flammable materials and areas accessible to children.
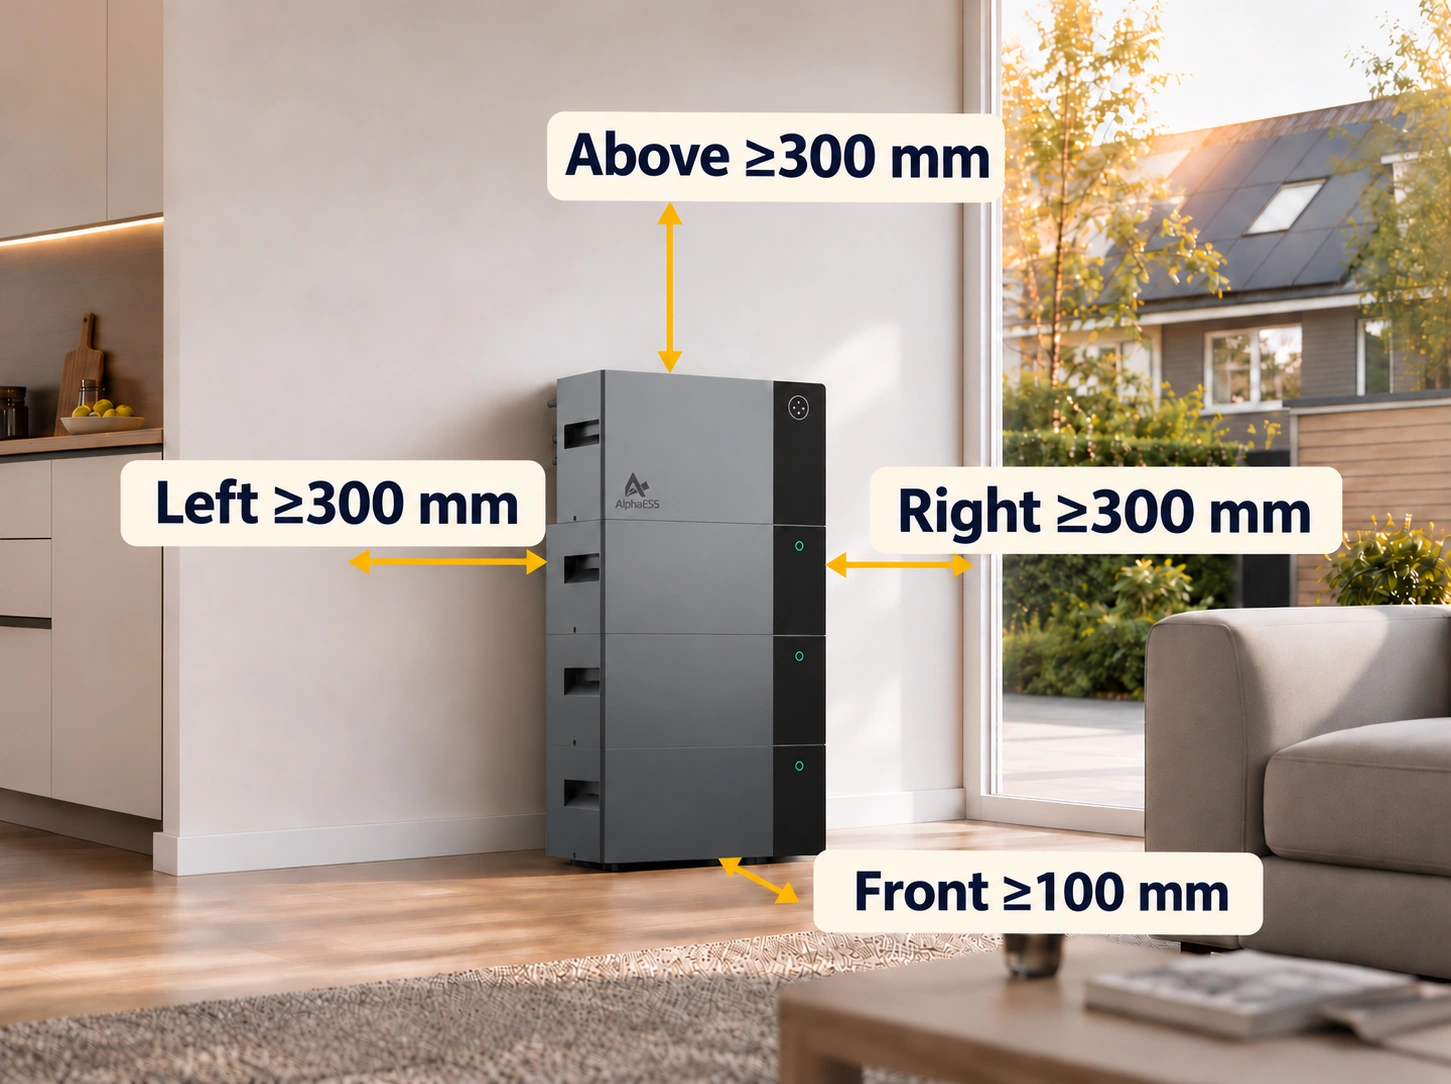
Above and on both sides ≥300 mm; in front ≥100 mm.
INFO
Keep ventilation clear
Do not block ventilation openings or store objects around the equipment.
Choose your configuration
INFO
Battery expansion steps are optional
The next two steps apply only to systems with VitaMate. Before adding batteries to an existing system, read the state-of-charge matching requirements.
Move the Bottom Connector
Only with VitaMate
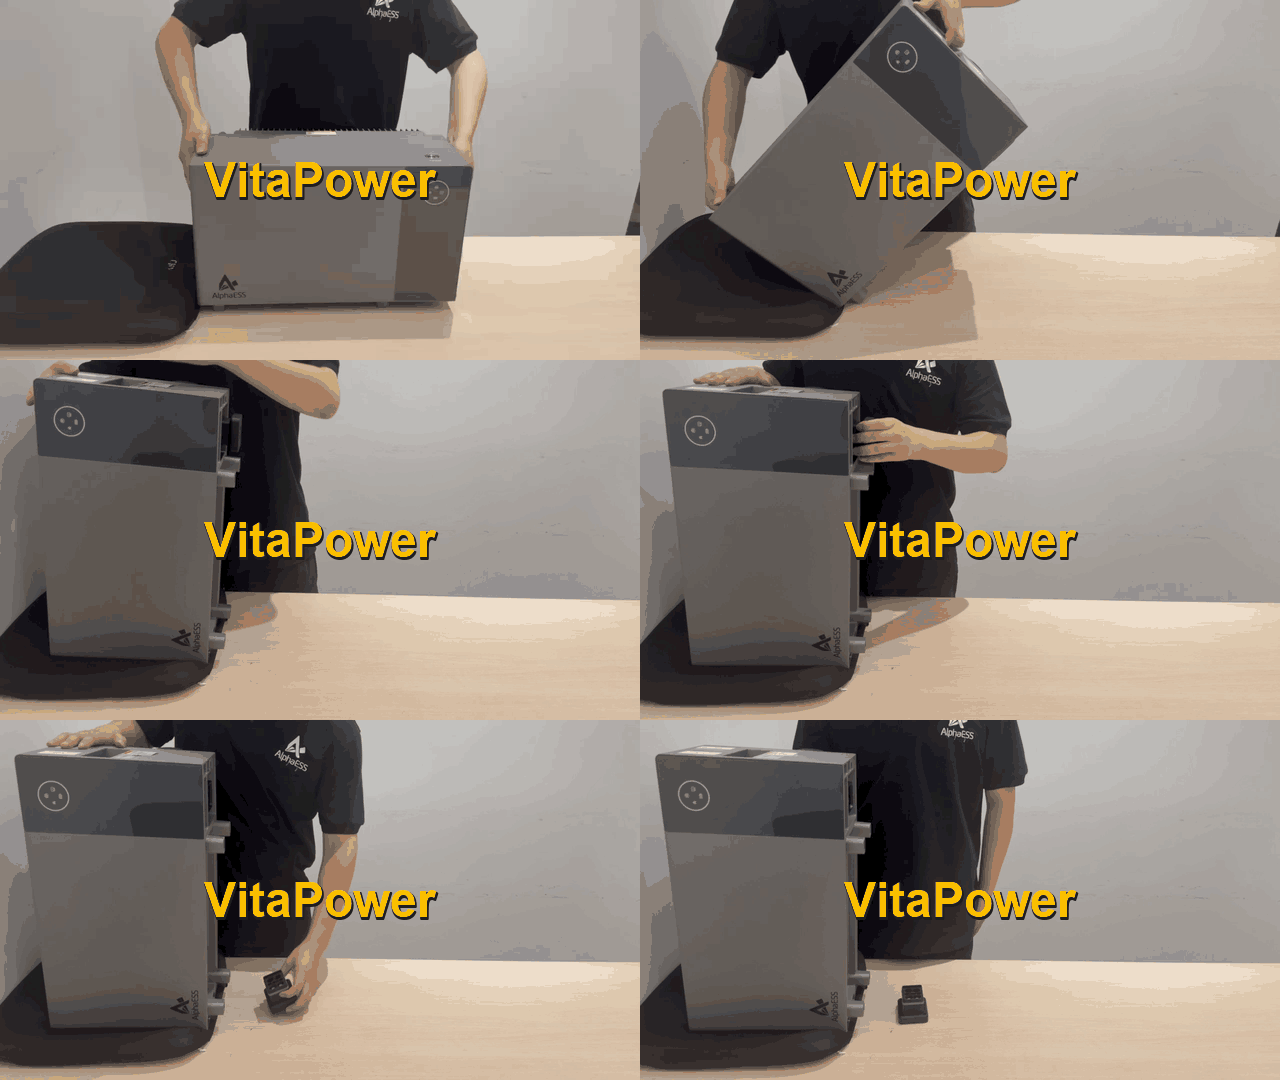
Remove the connector from underneath Alpha 3600 AC
Use a PH2 screwdriver to remove the Bottom Connector as shown in the quick guide.
Install it underneath the lowest VitaMate
Remove the relevant dust cover, then fit and secure the connector. Do not leave it underneath the main unit.

DANGER
Check after installation
The connector must be securely fitted underneath the lowest VitaMate. Never remove or fit it while the system is powered. After removing dust covers, do not touch the battery connection terminals.
Install the bracket, stack and secure
Only with VitaMate
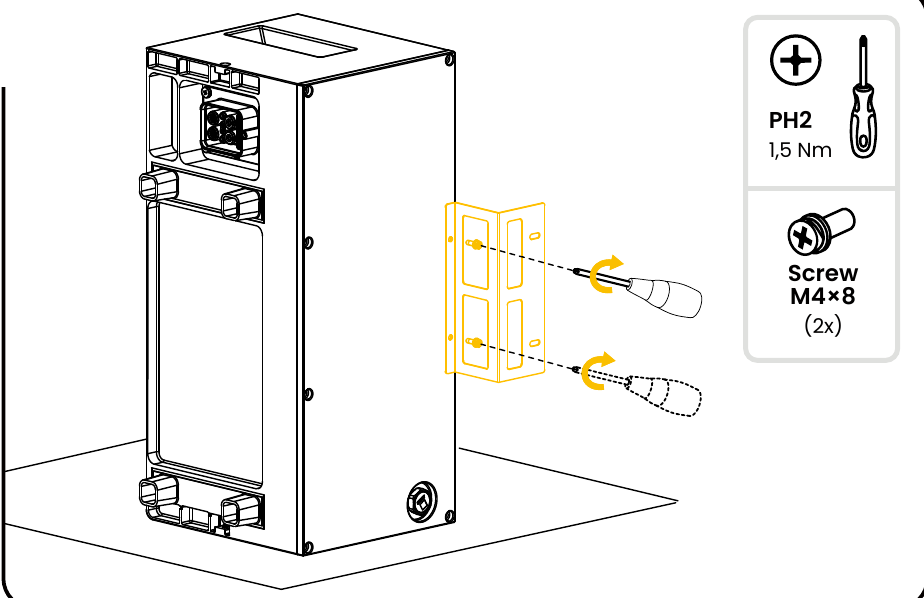
Follow the bracket position shown for your configuration in the quick guide.
Prepare the bracket and battery connection surfaces
Fit the bracket underneath the battery immediately below Alpha 3600 AC. Remove the dust covers from the surfaces to be connected, as illustrated, without touching the battery connection terminals.
Align the positioning features and stack
VitaMate goes underneath; Alpha 3600 AC must always be at the top.
Secure the wall-mount bracket and screws on both sides
Drill and fasten as shown in the quick guide. Check that every module is securely connected.

INFO
Heavy equipment: handle carefully
Alpha 3600 AC weighs approximately 44.9 kg and VitaMate approximately 36.1 kg. Use handling methods suitable for the weight to prevent dropping or trapping injuries.
Connect to the grid
Check that the system is off and the socket is suitable
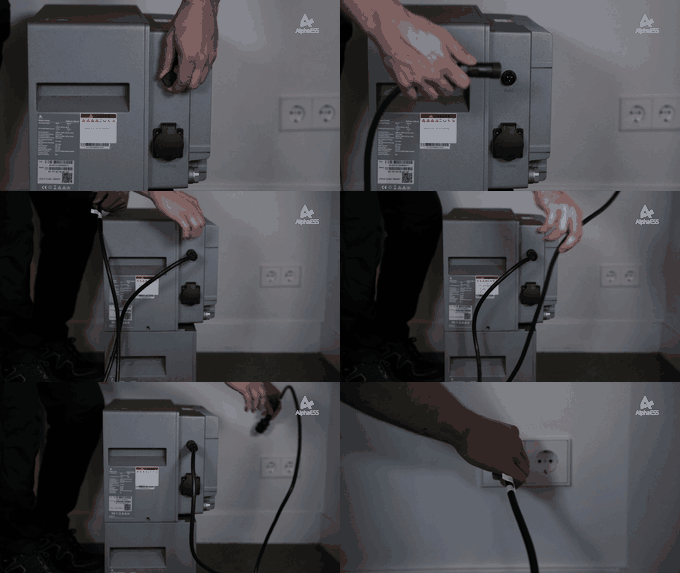
Use the supplied AC power cable and a suitable grounded wall socket.
Insert the AC connector into Grid
Push it in until it clicks into place, then check that it is locked.
Insert the plug into the wall socket
The system starts automatically when the AC power supply is connected.
DANGER
Do not interchange Grid and Backup
Grid connects to the AC power supply. Backup only connects to appliances requiring backup power. Never connect Backup to a wall socket or distribution board.
Unlock the maximum power
DANGER
Electrical work by qualified professionals only
The circuit installation and electrical checks required for higher power must be carried out by qualified professionals.
You can request a power increase in the Energy Life app.
For higher power, Alpha 3600 AC must be connected to a fully dedicated circuit with no other appliances connected.
- Maximum AC input/output: 3680 W / 16 A
- Installation requirement: Dedicated circuit (No other appliances)
The permitted power depends on the installation, local requirements and device settings. Have a qualified professional check the installation before submitting your request in the app.
Connect P1 Meter
Connect a compatible P1 Meter (model SMILE-A-AECP1-R12-WB) to the smart meter’s P1 / DATA port.
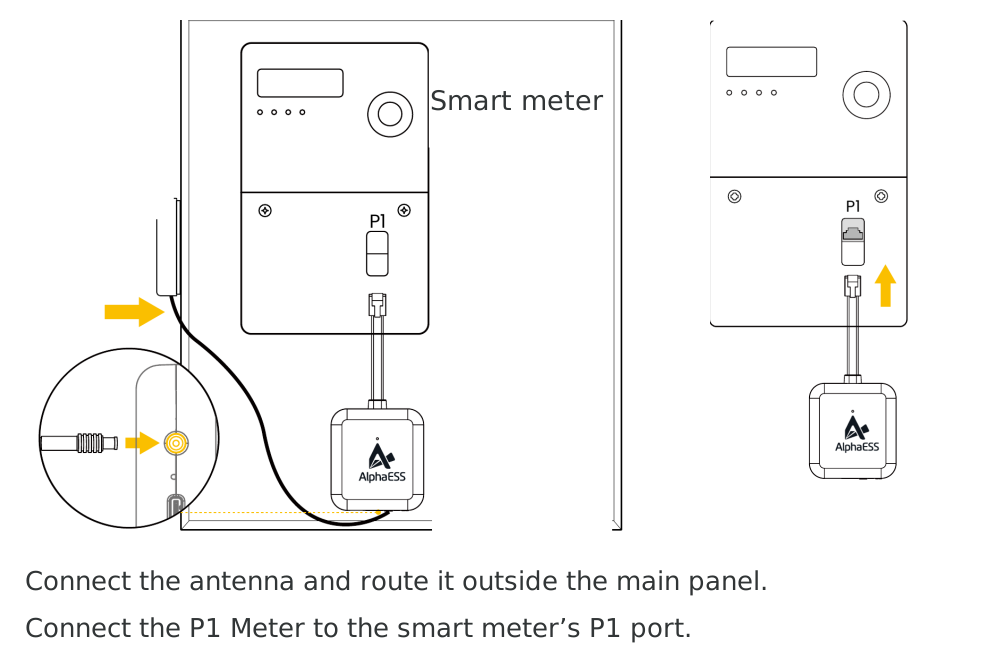
Connect the antenna and position it outside the distribution board, then insert the dongle into the meter’s P1 port.
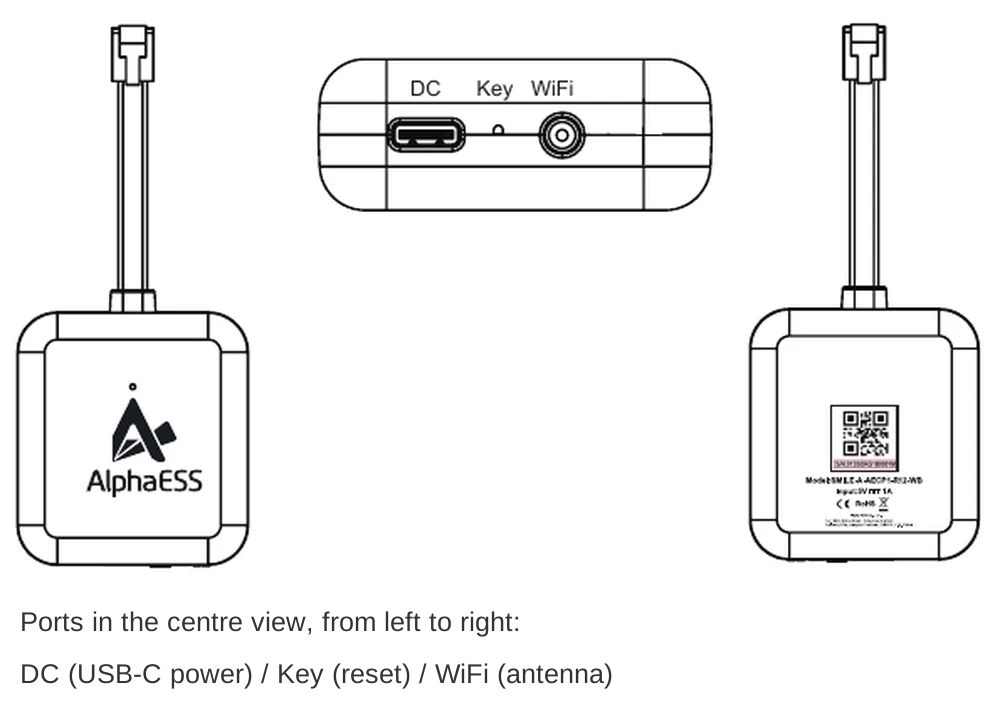
DC is the USB-C power port, Key is the reset button, and WiFi is the antenna connector.
- DSMR 5.0 and above: Usually powered through the P1 port. Check that the indicator lights up after connection.
- DSMR 4.0 and below: An additional 5 V / 1 A USB-C power supply is required.
INFO
Check that the meter supports P1 and the port is enabled
The dongle cannot read data if the port is not enabled. A 2.4 GHz Wi-Fi signal is required near the meter. Check your order to see whether P1 Meter is included.
First start-up and final checks
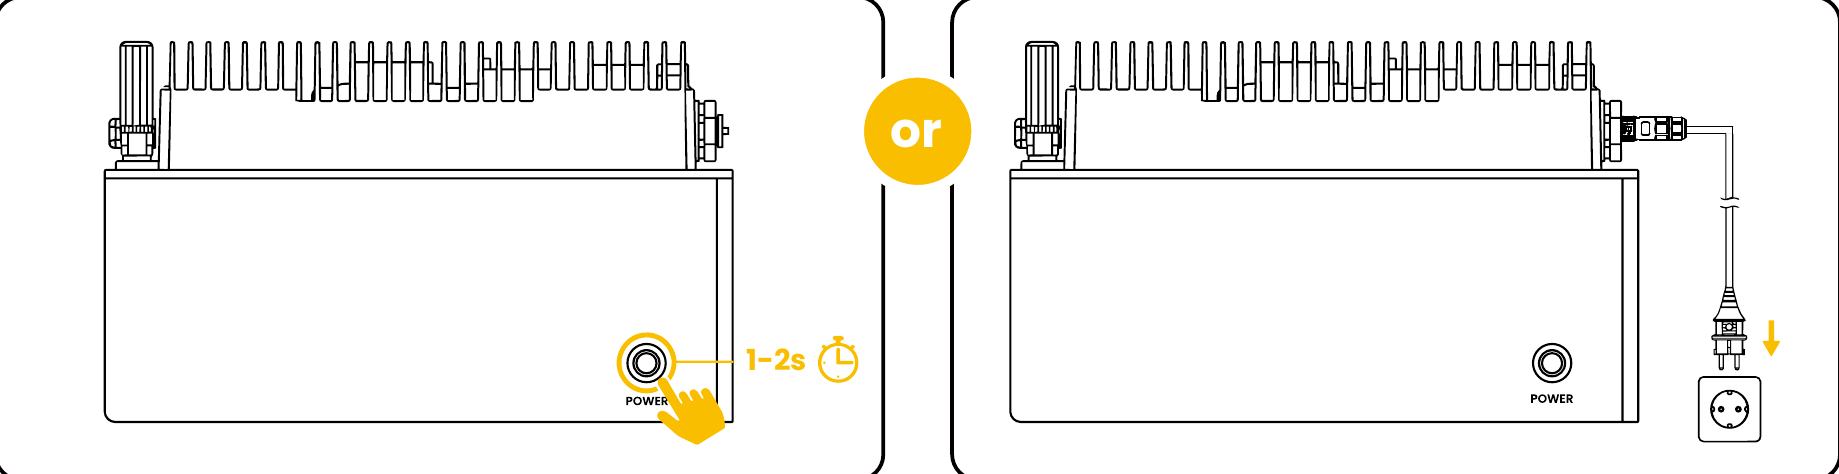
Two ways to start: hold POWER for 1–2 seconds, or connect the AC power supply.
- The equipment is stable, with the required clearances and ventilation.
- If VitaMate is installed, the Bottom Connector is underneath the lowest battery, and the bracket and screws are secure.
- The Grid connector is locked, the system has started, and no fault indicator is lit.
Next step
Complete setup in Energy Life
For registration, Wi-Fi setup, adding devices and operating mode settings, use the app manual. Then check that the device is online, the capacity is correct and P1 data updates normally.